Dialog Box Launcher Word For Mac 2016
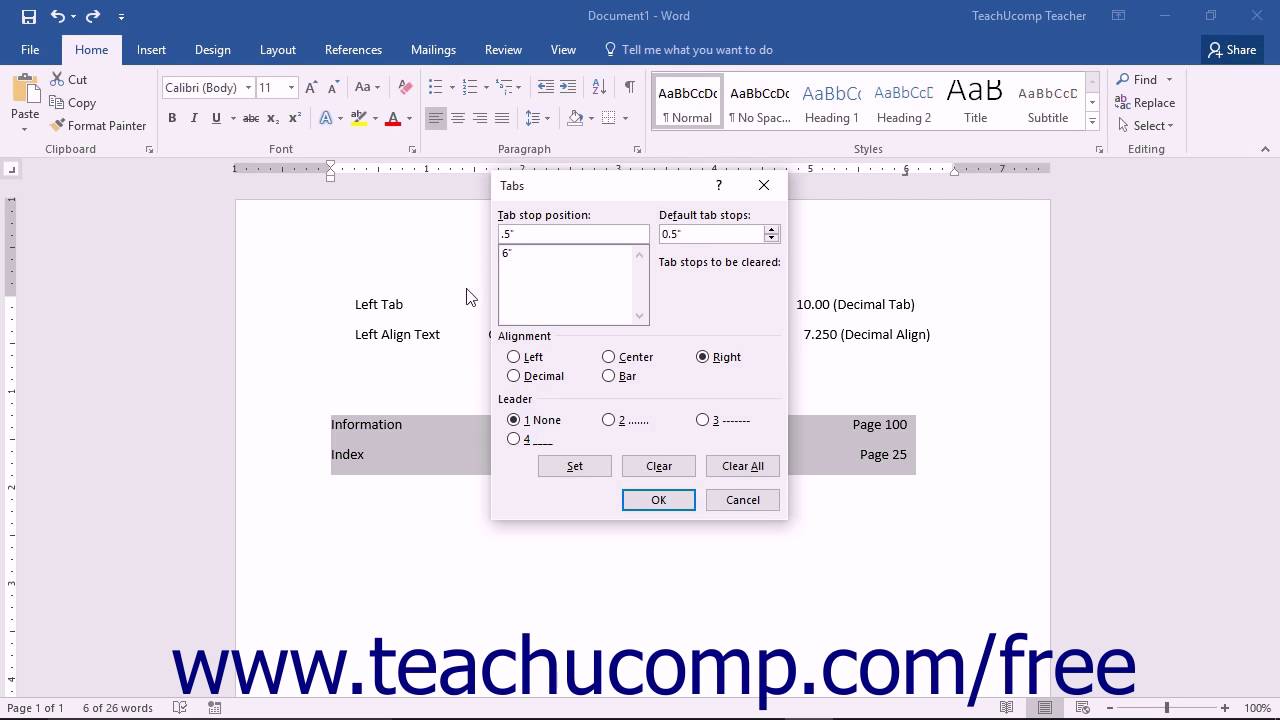
Dialouge box launcher. Word 2016 features a single location where all your font-formatting dreams can come true. To summon the Font dialog box, obey these steps. Displays your document in full-screen mode. In the bottom-right corner that you can click for even more options.
In this lesson we are going to introduce word 2016 user interface. The goal of the Microsoft Office working environment is to make working with Office documents, including Microsoft Word documents, Excel workbooks, PowerPoint presentations, Outlook email messages, and Access database tables, as intuitive as possible.
As with all Office 2013 programs, the most common way to start Word is from the Start screen (Windows 8) or the Start menu (Windows 7) that is displayed when you click at the left end of the Windows Taskbar. When you start Word without opening a specific document, a program starting screen appears, from which you can create a new document or open an existing one. Either way, when you’re working with a document, it is displayed in a program window that contains all the tools you need to add and format content.
Open Word 2016
Working with Word 2016 User Interface
Working with word 2016 user interface is very easy and simple, you have to open the word program. If you don’t know how to open word 2016 for the first time visit this article. open word 2016 on windows 7,8,10 and Mac OS. When you open word, you may see the screenshot below. Just put glance on it then we will identify each section of word interface.
To get up to speed quickly with Word, it helps to understand the various elements of word window. These include standard window elements such as the file tab, quick access toolbar, title bar, sign in, share, tell me what you want, ribbon, tabs, dialog box launcher, status bar, zoom control and so on.
- Quick Access toolbar: This area gives you one click access to commands that you often use. To learn how to customize this toolbar, click on small triangle at upper left-hand side then you will see “Customize the Quick Access Toolbar”.
- Title Bar: The title bar display the name of current document. For the first time it is document when you saved your document the will display on the title bar.
- Sign in: Here you can use most of microsoft word functionality. You must have a proper internet connection then sign in with Microsoft account. If you don’t know how to create Microsoft account or what is Microsoft account click here.
- Share: You can share the documents with your friends then working on it groupwise. Click on share button then share it in your network and how to do this? Later on we will discuss on these things.
- Tell me what you want to do: It is the new feature which has came newly in word 2016. This is the best functionality of Microsoft office 2016. When sometimes you forgot anything that Watermark was in which tab? So just search in tell me what you want to do search bar then you will get the result. It’s really make office users work very easy.
- Ribbon: This area will help to access all word options and features such as formatting, bulitting, giving heading, insert tables and so many more. If there is not the thing which you want so you can add a new group that later on this step by step word 2016 guide we will show you.
- Tabs: As you can see the screenshot below, we have a lots of tabs like; File tab, home tab, insert tab, design tab, layout tab, malings, review and view tab. Through this word 2016 pictorial tutorial you will learn all these things.
- Dialog Box Launcher: for more customization you can click on dialog box launcher. It will help you to access more Word functionality and more options.
- Status bar: This are display miscellaneous information of your current document like; number of pages, how many words are used language and so many more.
- Zoom Controls: This area display your page zoom in or zoom out. By taking the small line button to right for zooming and left for zoom out. Simply you magnify your document.
Creative sb0350 audigy 2 zs sound card drivers for mac pro. Introducing Word 2016 User Interface
If you have got any question regarding to word 2016 user interface just put a comment below. Thanks for being with us. Wait for the next word 2016 tutorials.
Styles dwell on the Word 2016 Home tab, in the aptly named Styles group, as shown here. What you see on the Ribbon is the Style Gallery, which can be expanded into a full menu of style choices.
This is a little less secure if someone else has access to your Apple ID and password, but is convenient if you.Tick the box for Set time zone based on current location.  This hint will appear on your Lock screen if you type in the wrong password on your Mac. Tick the box to Allow my Apple ID to reset this password. This will be your administrator password, which is used to create new accounts and access system features across your Mac. Enter a Hint to help you remember your password.
Click the dialog box launcher in the lower-right corner of the Styles group to view the Styles pane, also shown. To dismiss the Styles pane, click the X (Close) button in its upper-right corner.
The Styles pane lists more styles than the Style Gallery, including styles you’ve created.
To preview the styles in the Styles pane, put a check in the box by the Show Preview option, found at the bottom of the Styles pane.
You can see more information about a style by simply hovering the mouse pointer over the style’s name in the Styles pane.
To view all available styles in the Styles pane, click the Options link (in the lower-right corner). In the Styles Pane Options dialog box, choose All Styles from the Select Styles to Show menu. Click OK.
Word’s predefined styles are specified in the Style Gallery, though you can customize the list to replace Word’s styles with your own.